Custom Fields Tab
You can add a Custom Field for users’ accounts. Manage > User Settings > Custom Fields Tab.
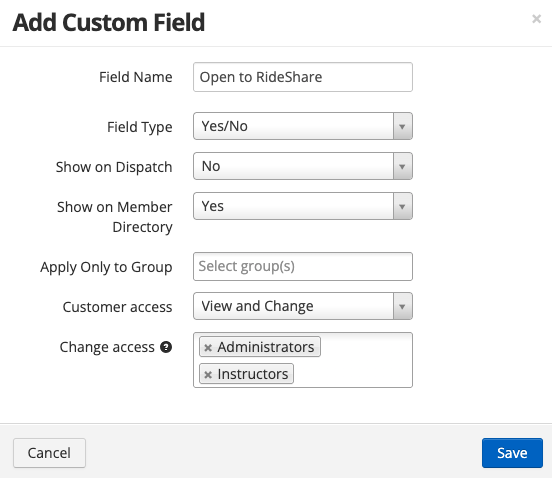
- You’ll create a Field Name and Field Type. Field Name can be Primary Instructor, for example. Field Type can be: Text, Date, or Yes/No. If Date is selected an expired option will appear.
- Select if you want it to show on Dispatch
- Select if you want it to show on Member Directory (Dashboard)
- Select if you want it Group-specific
- Select User Access
If User Access is enabled the user will select their name in the far right corner > My Account > More tab to see their custom field(s).
When using type Text, if you enter a web link (eg. www.yourlink.com), when we show the value on the user’s account, we also make it link out for easy access.
Email Notification (Expired): 30 days before the set expiration date, an email will be sent to the user, and the FBO reply-to email that the date is expiring in 30 days.
If you choose to show on Dispatch. This facilitates customers information, per user, that you might want to review during dispatch.
If your custom field type is a Date or Yes/No you can use it as a Scheduling Restriction.
Drag+drop to re-order the list while in this tab.
In Manage > Users > Select User > More Tab. You will now see those variables customized for that user.
- Custom Fields that show on dispatch will NOT show if they have empty values
How do you refer to your users?
You have the option to choose:
- Client/Clients
- Customer/Customers
- Member/Members
- Pilot/Pilots
- Student/Students
- User/Users
The selection you make here will set that displayed name for your whole Organization.
Allow Users to Self-Register
When on (default), any user in Flight Circle can find your Organization and request access. If you do not want users to discover you, you can set this to No in Users Settings.
When a user requests access, the Super Administrator will receive an email notification to Approve their access. You can also see a list of pending users at Manage > Users > Pending (via the Approved dropdown)
Default landing page for new users
You can choose from Schedule, Dashboard, Messages, or Reports. Whatever you choose here will be set for your whole Organization.
Keep in mind this is for NEW USERS. This would only apply if this is the first APPROVED association. Eg. new user, newly association, or approved user, etc. If the user already has another approved association, then no changes will be automatically applied to their account.
Users have the choice to also select their default landing page in their own account by selecting their name in the far right corner > Settings > My Associations > Clicking one > Default landing page.
Users can update their basic contact details
Enable at Manage > Users Settings > “Users can update their basic contact details”
When enabled, profile information the user sets (name, address, phone, date of birth, and emergency contact details), will be copied to your Organization’s own contact record for the user. This reduces admin time, and likely will provide the most up-to-date details, as users frequently update their own information.
When Users can update their basic contact details is enabled in User Settings, their updates will automatically update your own. Any information you try to edit for them will be overridden by what information they have in their account. If you need to make edits request the user change it in their account.
Users can update their own details from their Name menu at the top right > Settings > Personal Information
If information is updated, once a day super-administrators will receive an email summary of all changes, showing the previous and new information so you can audit.
Updates will only occur for users that are Approved. If a user abuses the feature, simply delete them to remove their access.
If information is left blank by the user, but completed by the Organization, the information will not be overwritten with empty values.
TIP: After enabling, use Messages to send a mass email to all users asking them to update their details. =)
Share basic contact details with all users
When enabled, approved basic users can see the name, telephone number, and email for each user in that Organization. No other information will be shared.
Users can “opt out” of this feature by going to their Name menu at the top right > Settings > My Associations. Here, they can Edit and un-check “Share my personal information with this organization.”
Allow user access to their Pilot profile: Off / Read – Only / Update
Enable at Manage > Users Settings.
Read – Only: To ensure pilot information (eg. medical, flight review, certificate, etc) is current, while maintaining security and integrity of the information, you can allow basic users to review their own record, as you have it set. They can alert you of outdated or incorrect information, but cannot change it themselves
Update: Users can make changes to all values except TSA and Aircraft Checkouts.
Users can view their record from their Name menu at the top right > My Account > Pilot (tab). If more than 1 Organization association exists, switch to that Organization first.
Access to Own Files: You can set to OFF, View Only, Upload Only, View and Upload, and Full access. View and Upload will enable them to upload files to an existing category.
Full access: Full access allows all access like add, edit, and delete. When set to Full Access, all basic users will be able to add their files to existing categories as well as create new categories
Categories: If you no longer need a Category, remove all the files from that Category and it will be deleted. You can Export the Users Report and see Files Categories. Under Files Categories, you can see what user files are in the specific category.
Member Directory: Turn this on if you want to share all users basic contact details in the Member Directory.
Allow basic user self Dispatch and Check-in: you can set to No, Dispatch Only, and Dispatch and Check-in.
Note: If enabled and a users information is not appearing in the Members Directory, they most likely have Share my personal information with this organization unchecked. They can check that box by going to their name in the far right corner > Settings > My Associations > Select the Organization > Check the box.